Hey friends! Today’s post is a first for me…this will be my first attempt at a tutorial! And of course I pick one of the things I’ve always had the most trouble with….winged eyeliner. And because my eyes are hooded/partially hooded, it makes the process even more challenging.
For those who may not know, a hooded eye is where the fleshy part of the skin under the brow covers up all or a portion of the eyelid. When my eyes are completely open and I’m looking at myself straight on, the moving part of my eyelid is covered by the skin from above. My eyelid isn’t totally covered, but often when I wear even thin eyeliner, you can’t see my eyelid at all when my eyes are open. So I would say my eyes are partially hooded.

I’ve watched quite a few tutorials about winged eyeliner (some specifically for hooded eyes) in order to get ideas of what different techniques people like to use. I often find myself dissatisfied because a lot of the times the technique is “just draw the winged part like this *draws perfect line with no reference to placement* and then fill it in.” Really? That’s it? For us hooded eye girls, we know that drawing a simple diagonal line going from the edge of the eye toward the eyebrow tip or based on the lower lash line doesn’t necessarily cut it because when our eyes are open, the hood cuts into the wing so it either looks crooked or you can’t see it at all. So I wanted to attempt to show you with as much detail as possible what has been working for me and my hooded eyes!
Please note that this whole process is totally dependent on your own eye shape. One hooded eye is not the same as the other. Like I mentioned before, my eyes aren’t totally hooded, but are definitely partially hooded at the least. But I do hope that this may be helpful overall, and I’ll try and explain as best I can!
For this look I used the Physician’s Formula Eye Booster 2 in 1 Lash Boosting Eyeliner and Serum in the color Ultra Black which I did a post on quite some time ago.


I often like to start with the wing itself. The most important part of this to me is WHERE to draw the line. I like to reference two points which I’ve marked down below. The first is the lower star which is simply the point at the outer corner of my eyelid. The star above it is where my hood ends. The key for me is keeping the wing UNDER the line created by these two points. Because if I put it above this line, my hood will intersect with the wing and make it wonky!
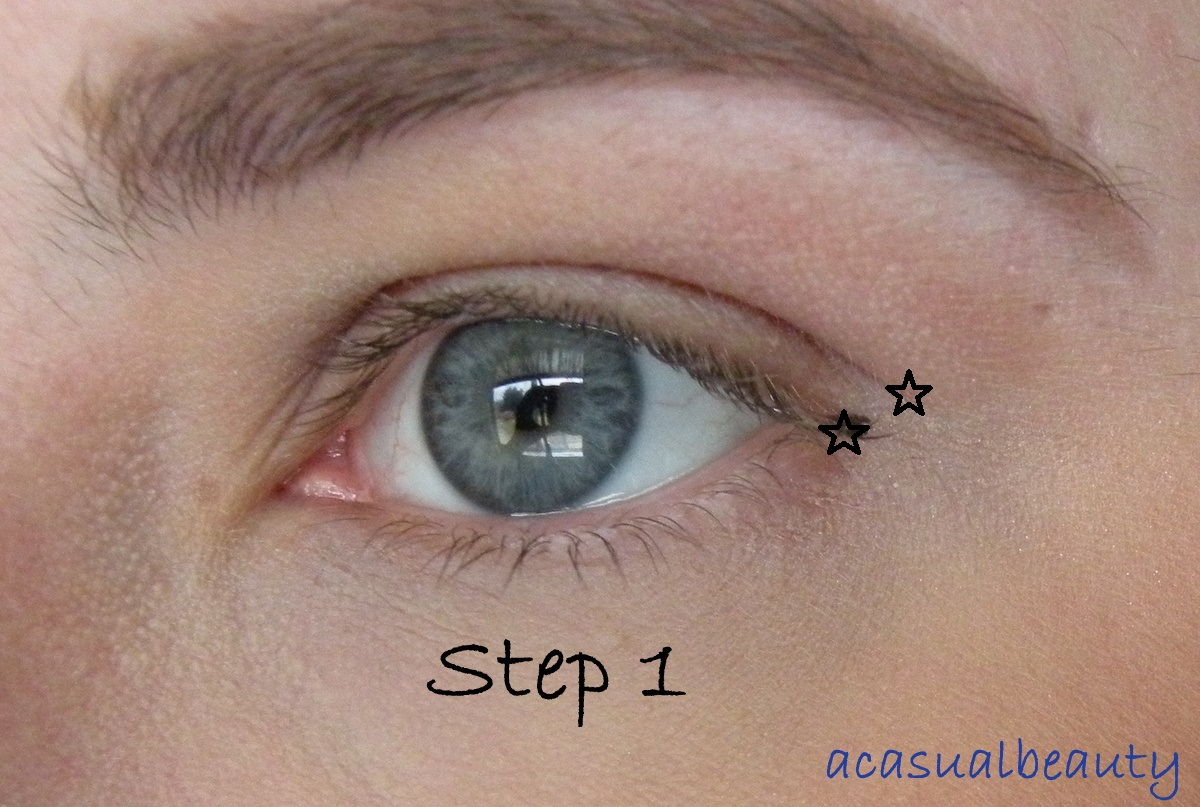
I usually don’t make single dot alone as my first step, but I just wanted to show you where I’m starting. I usually draw in the wing shape all at once which I show below (that’s why all of these photos are Step 1.)

Aside from making sure the wing is under the two starred points, something else I’ve found that works well for me is to make the wing shaped slightly curved instead of a straight, diagonal line. That helps keep the wing under the hood.

Here I have drawn a slightly curved line under the two points I marked earlier starting from that little dot I marked. Think of it as a very shallow U shape. Don’t worry if it’s messy at this point! Cleanup time comes later.

Below are the stars again so you can see that I’ve tried to keep the whole wing on or slightly underneath those points.
 ‘
‘
Step two is to simply draw a thin line across your upper lash line.
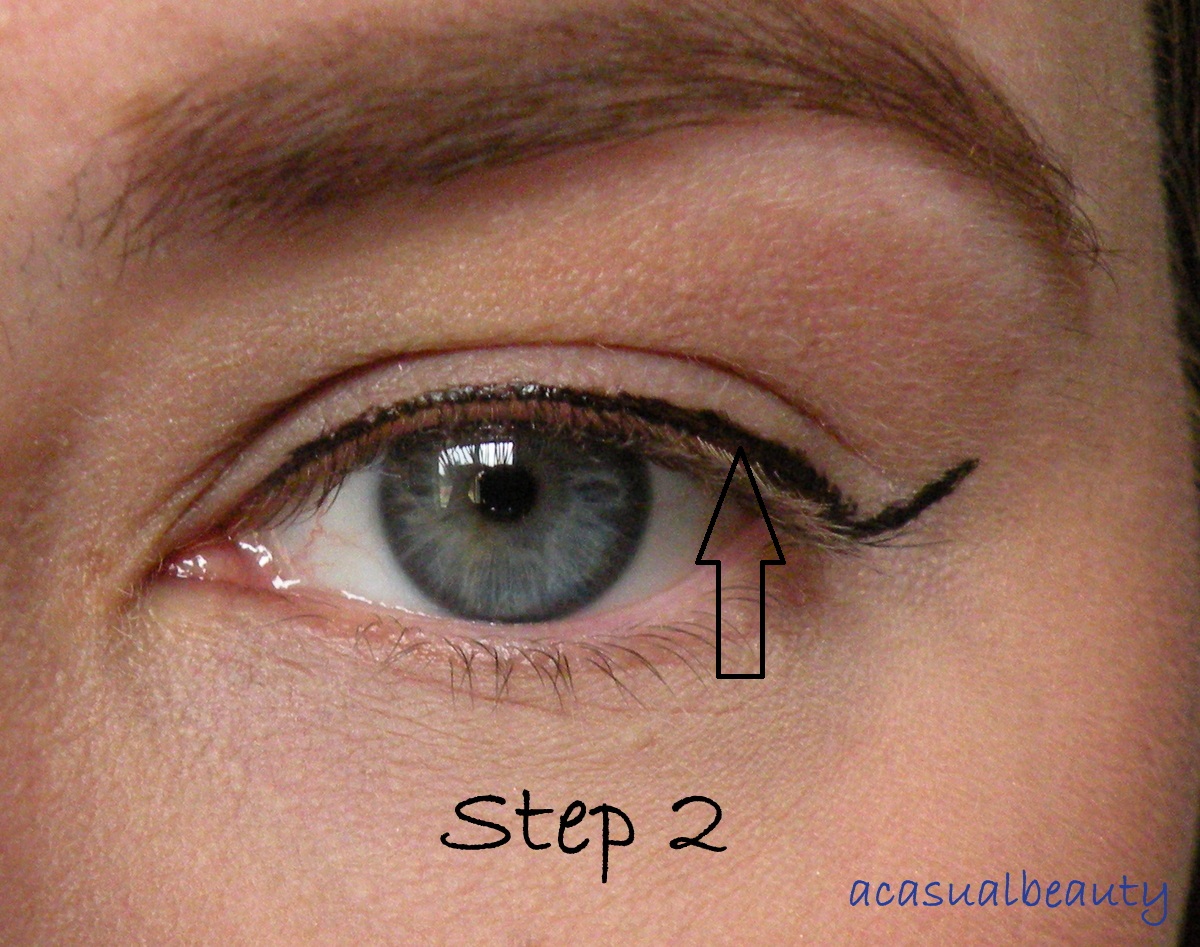


Step 3 involves the wing. I start from the red dot on the right (on the wing) and draw a slightly curved line towards the inner corner stopping at about the middle of the eye. This creates an open shape (which sadly I forgot to photograph) like a triangle which you then just color in with your liner. I keep the line curved because I’m still trying to keep the whole wing somewhat under those two star points I keep referencing. As you can see, the red dot on the wing isn’t exactly at the very end tip of the wing. Keeping it lower is better and it’s less likely you’ll cross the hood line. You can do this in multiple steps starting even lower on the wing than I did. Start out with tiny, thin lines going back towards your eyelid and then build up as you need.


It definitely looks a little odd from above! But I feel that with any technique used for hooded eyes, you will end up with a somewhat odd shape when you look down at it. But the point of this is to look good from straight on.

Step 4 is to thicken up the whole line slightly mainly focusing on the eyelid. I’ve carefully taken the liner and gone over the whole shape making it a little bit thicker everywhere and and also making it more even to cover those messes from earlier. You can certainly make the line on the eyelid thicker but I didn’t want to cover up my whole eyelid when my eyes are open.

The photo below doesn’t look too much different from the odd shape a couple pictures above, but I do think you can see how I’ve made the line thicker on the eyelid and tried to clean up any patchy line work.


You may be able to see below how the placement of this wing could drag the eye down a bit (the wing is pretty low on the eye and even goes a little bit below the lower lash line.) But I often prefer this technique to fiddling around with trying to get a higher wing unless I’m wanting a super bold and thick liner. And honestly, when your whole eye look is done, no one is going to notice that. If they do, they’ve got too much time on their hands!

So there we have it! I really hope this was helpful and made sense! I’d be happy to answer any questions about this process and as always, thank you so much for reading 🙂

This post brought me to your blog. I just tried it and and for the first time in my life (late twenties here), I made a successful cat eye! Thank you and you are a fantastic teacher. The “dots” on the pictures and multiple angles really helped me understand.
LikeLiked by 1 person
Thank you so so much! I am SO happy it helped. Some people commented that they were going to try it but you may be the first who actually tried it and let me know how it worked out in the end. I’m so excited it helped you, that made my day 🙂
LikeLike
Pores for Thought directed me to check out your post. This will hopefully help me out the next time I try out winged liner. I always end up with it all over the place.
LikeLiked by 1 person
Well I appreciate that! Really hoping it works out for you. Even now I still mess it up all the time haha, just a tricky thing for many of us 🙂
LikeLike
Thank you, thank you, thank you for this tutorial! Ok, I didn’t even know I had partially hooded eyes until I read this! Totally explains why I struggle with making my diagonal line the way so many tutorials show. Mine just always becomes a mess because there is an extra fold of skin in the way. I’m going to try the U shape outside the creased area like you suggest. Thanks for all the detailed descriptions and photos here – I don’t see how I can possibly mess it up now… 🙂
LikeLike
You are so welcome! So glad it makes sense. It took me a while too to figure out why all the typical techniques didn’t work for me either. Really hope it works out for you! 🙂
LikeLike
Thanks for the great tutorial!! I have hooded eyes and love to wear winged eyeliner, the struggle is real but perhaps Ill have more luck now ❤
LikeLike
You are so welcome! I definitely hope it is helpful 🙂 The struggle is definitely there haha
LikeLiked by 1 person
This is the literally the best thing I’ve read all day. I have the same eye shape and the struggle is REAL.
LikeLike
Thank you so much!! I hope it works for you!
LikeLike
Thanks! The *CURVED WING* instead of trying to draw a *straight* line really works!
LikeLike
Yay Im so glad to hear that!!
LikeLiked by 1 person
I’ve been struggling with my winged liner for years, it just never worked out..
But right now seeing these pictures it’s like looking at my owm eye our hooded eyes are exactly the same!!
I’m in bed now so the first thing im gonna do when I wake up is trying this out!
You don’t know how happy I’m gonna be if this turns out well I will thank you forever
LikeLiked by 1 person
I’m so happy to hear that! I really do hope it works out for you! It’s so hard since I know that even hooded eyes aren’t the same and trying things that work easily for others but not for us is disappointing. Kind of like every other typical tutorial for a more “normal” eye for us haha. I will really be hoping it works out for you 🙂 Best of luck!!
LikeLike
Doing this tonight, thanks! I have a black tie wedding to attend 😉
LikeLiked by 1 person
I hope it works out! This is still one of those trickier things for me haha. Have fun!
LikeLiked by 1 person
haha for me too, I am debating if I should just do a nice dramatic smoky eye. Going to go check out what you have…I kind of have this one down 😉
LikeLike
Nice!
LikeLike
I also have hooded eyes and struggle with getting the perfect winged liner. I’m going to try your technique tomorrow! Thanks!
-Marci
http://potpourridaily.com/
LikeLike
I really hope it works for you! It’s a great thing once you find what works 🙂
LikeLike
Great tutorial Christina! You make it so easy 🙂
Caryl x – http://carylalmelor.com/
LikeLike
Thank you very much, Caryl 🙂
LikeLike
Great tutorial! I have super hooded eyes too, so this helps!
LikeLike
I’m so glad, thank you!!
LikeLike
great step by step tutorial! I have hooded eyes and totally agree doing a line for the wing first is essential!
LikeLike
Thank you! Yeah doing it this way has been so helpful. It’s nice to find something that seems to work over and over 🙂
LikeLike
What a great step-by-step!
LikeLike
Thank you!
LikeLike
Awesome tutorial! Loving the photos. Great job
LikeLike
Thank you hun, I appreciate it 🙂
LikeLike
I’m always having trouble with winged eyeliner , great quick and easy tutorial !
LikeLike
I’m with ya!! And thanks, it’s nice to find a technique that seems to work pretty consistently 🙂
LikeLiked by 1 person
Cool tutorial .. Even cooler are the images !!!!
LikeLike
Aw thank you 🙂
LikeLike
Great post I like how you’ve tailored it to hooded eyes and it’s a really great tutorial, I usually line my lashes first and then create the wing but I like the way it looks this way too great job!
LikeLike
Thank you! That would still totally work with this too since my line is so thin that it doesn’t obscure the edge of my eye. I’ve definitely done both 🙂
LikeLike
You’re welcome and yeah 🙂
LikeLike
Nicely explained dear. Thank you for posting it . Happy weekend 🙂
http://naturelbellefemme.blogspot.com
LikeLike
You’re quite welcome! Happy weekend to you 🙂
LikeLike
wow… this was an awesome tutorial! Like seriously well done! *claps* Since you know the problems people like us face… you’ve explained it so well… you should definitely do more tutorials!!
Love, Wink n Pout
Blog , App
LikeLike
Thank you so much!! I think I will now that I know taking the pictures isn’t too terribly difficult like I though it might be 🙂
LikeLike
great tutorial! I have two left hands when it comes to liner! I will do it following your pictures next! xx
LikeLike
Thank you!! I do too often times. And especially because my eyes aren’t exactly the same in every way it always looks different anyways 🙂
LikeLike
Yeah this is super well done you made it so easy to follow, really really well done!! :))
LikeLike
Aw thank you! Glad to hear it. That was definitely the goal 🙂
LikeLike
Excellent tutorial and great photos.
LikeLike
Thanks so much! I’ve been wanting to do it but didn’t know if I could actually do it since I always mess up my eyeliner haha
LikeLike